
In my last post, I talked about how running spot instances for my flexible workload (pushing Logstash-consumed logs to Elasticsearch) saved me about 70% when compared to continuously running an on-demand EC2 instance. However, I’ve discovered a new way to tweak this cost savings even more. By utilizing AWS System Manager, to spin up an instance on a specific schedule, I now have an 83% cost savings over running an on-demand instance. Let’s breakdown the cost:

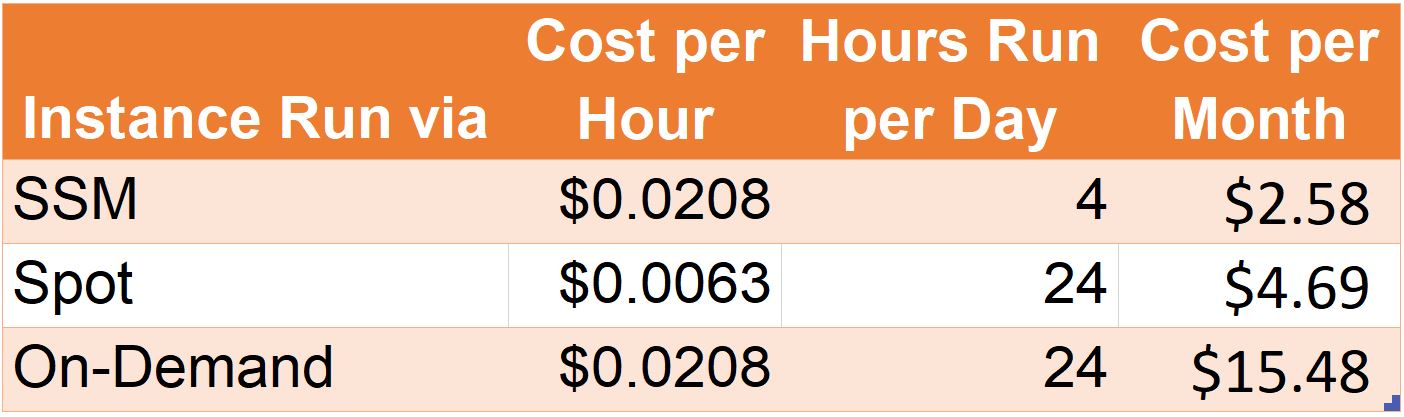
In my case, an EC2 t3.small instance (the smallest instance which supported my requirement) cost me $0.0063 per hour. But when utilizing AWS System Manager’s automation feature, I can schedule a specific instance to start and stop when needed. Choosing two different periods per day, running the instance for two hours each, provides a 45% savings over using spot instances and a total savings of over $12 a month, and for my case, this works perfectly for my needs. In this post, we’ll cover the use case for automating and scheduling EC2 instances, prerequisites, how to configure, and other scenarios which can capitalize on this technique.
Use Case
In my scenario, I use a Logstash server to process CloudFront CDN logs, so I can get useful information about access to my website. CloudFront pushes these logs to an S3 bucket, where they are stored indefinitely. The Logstash server scrapes the bucket for any new log files and maintains its own database of what it finds in S3. In cases such as this, I don’t require Logstash to be continually running. I simply need it to turn on, scrape the bucket for any new log files, push the results to an Elasticsearch instance, and then turn off again. In my case, I’m happy if the Elasticsearch data is updated a couple times a day. All tied together, the architecture looks like this: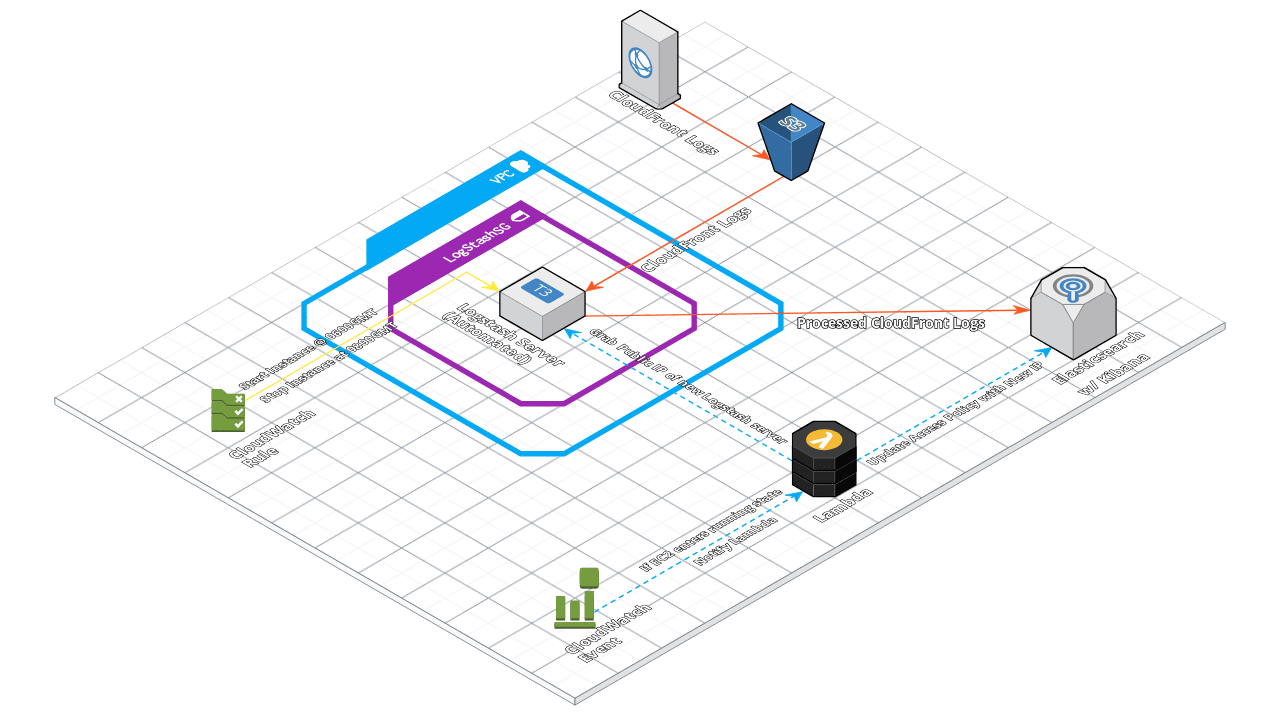 So, this is a very flexible workload and these types of workloads are ideal cases for this technique: Pre-configured servers which can start, perform a task, and shut down again; where always-on, high availability isn’t required.
Prerequisites
Prior to beginning the example configuration, there are a couple of required items:
- An AWS Account which has administrative permissions within your AWS environment. If your account does not have these permission, your administrator will need to assign your account AmazonSSMFullAccess permissions. For more details, please see this topic within the AWS documentation.
- A known instance ID for a stopped or started EC2 instance. AMIs won’t work here; this instance must be already provisioned. In the case of this demonstration, it will be i-02ffe90aa29a3130e; yours will be different, and can be obtained from the EC2 page within the AWS Console.
How-To
The first thing we’ll need to create is an IAM service role (with an attached policy) which allows AWS System Manager to assume automation tasks within your environment. To do this, go to the AWS IAM dashboard, click “Roles” (1), and then “Create Role” (2).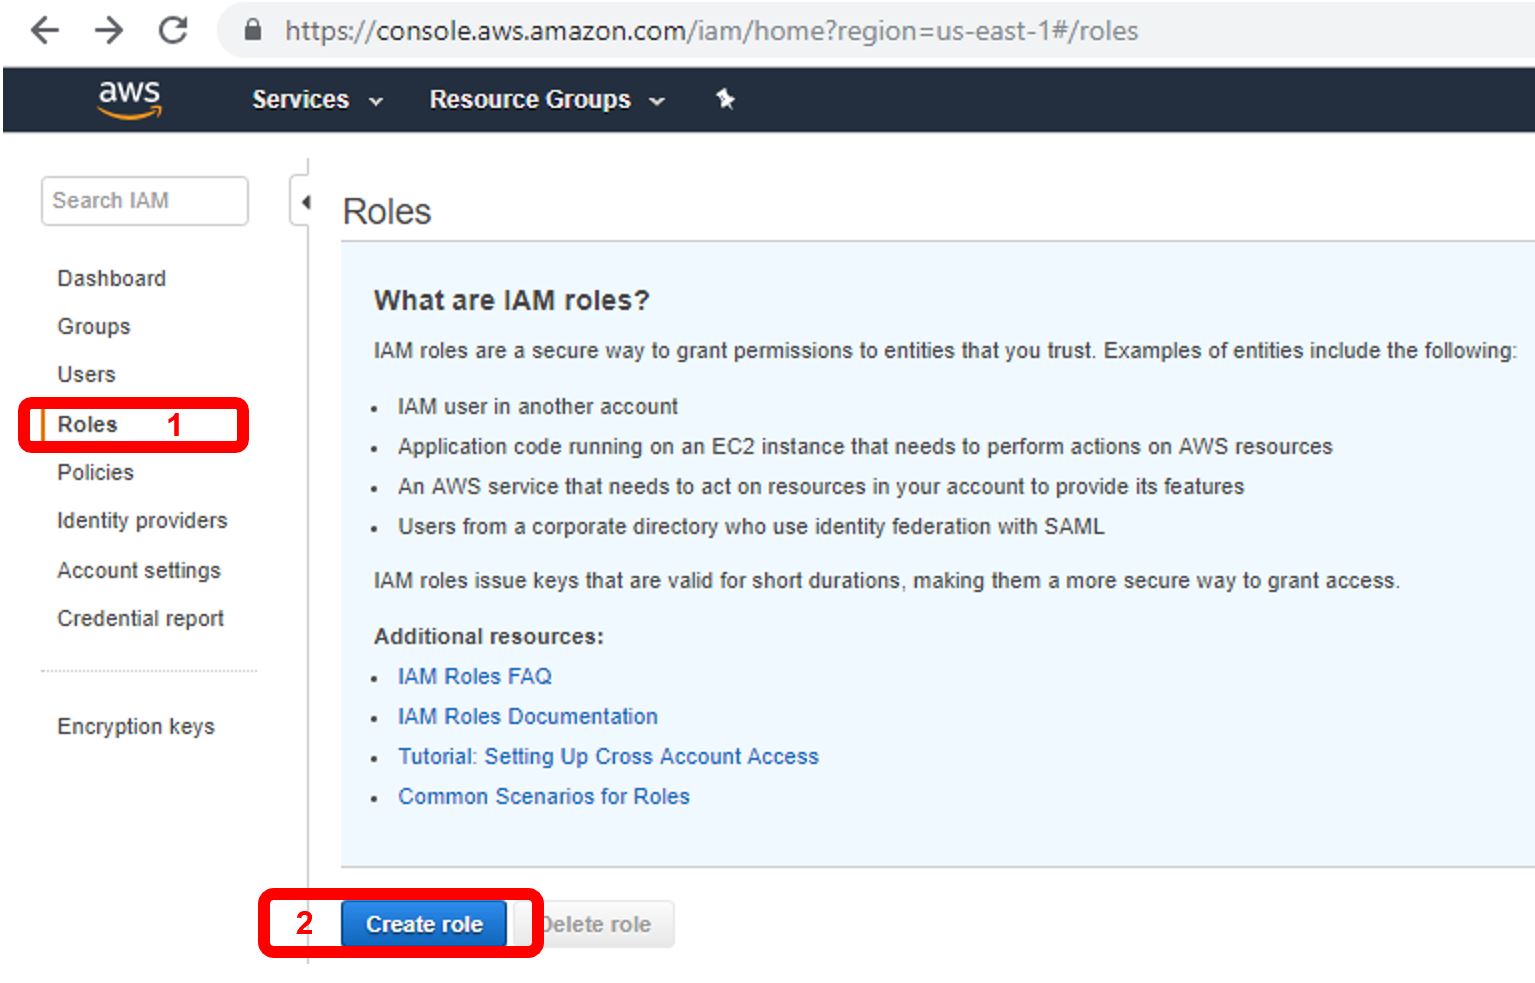
For trusted entity, choose “AWS service” (1). Choose EC2 for the service this role will use (2), then click “Next” (3).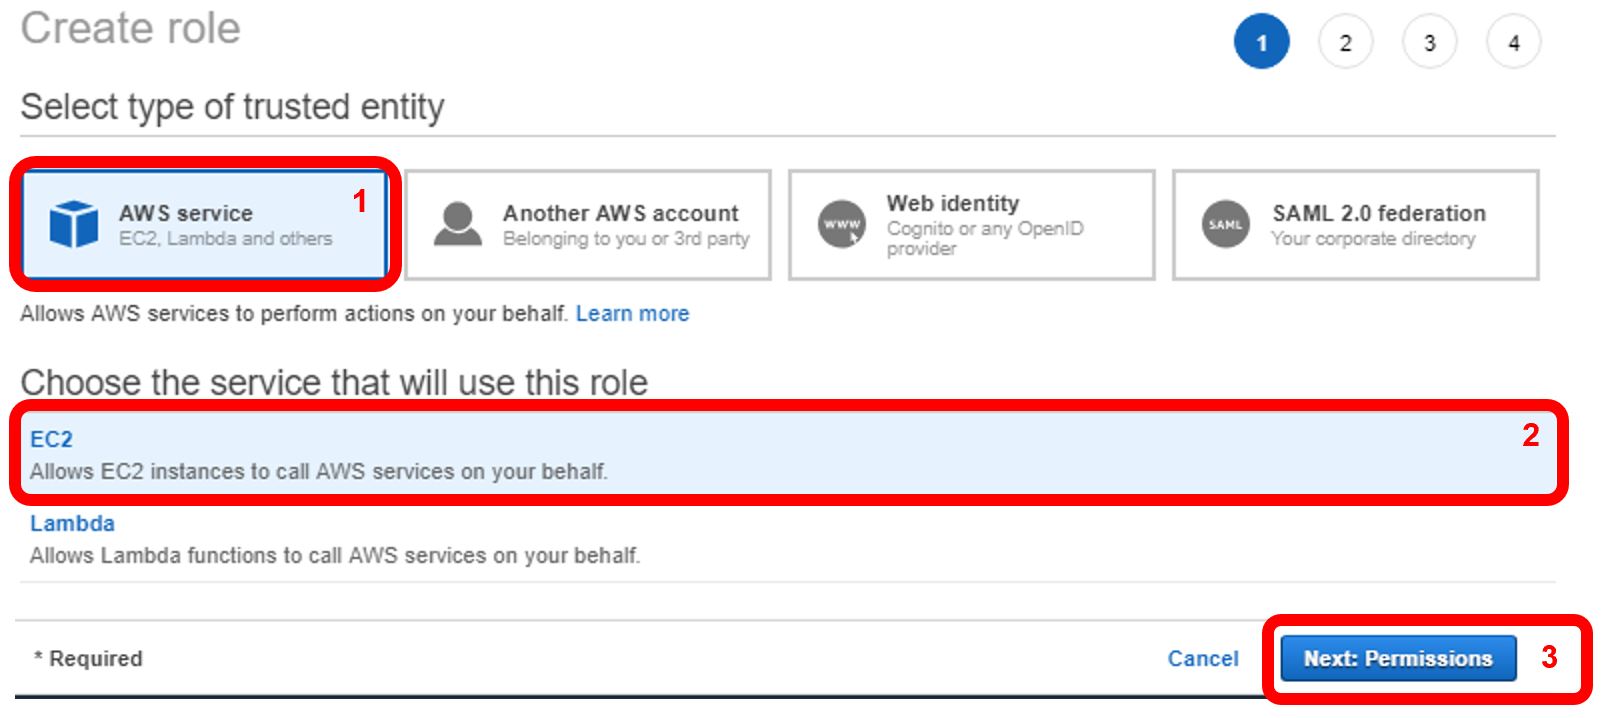
Next, we’ll attach permissions to this role. In the “Filter policies” search box (1), type “AmazonSSMAutomationRole”. Select the AutomationRole below (2). Click “Next: Tags” (2).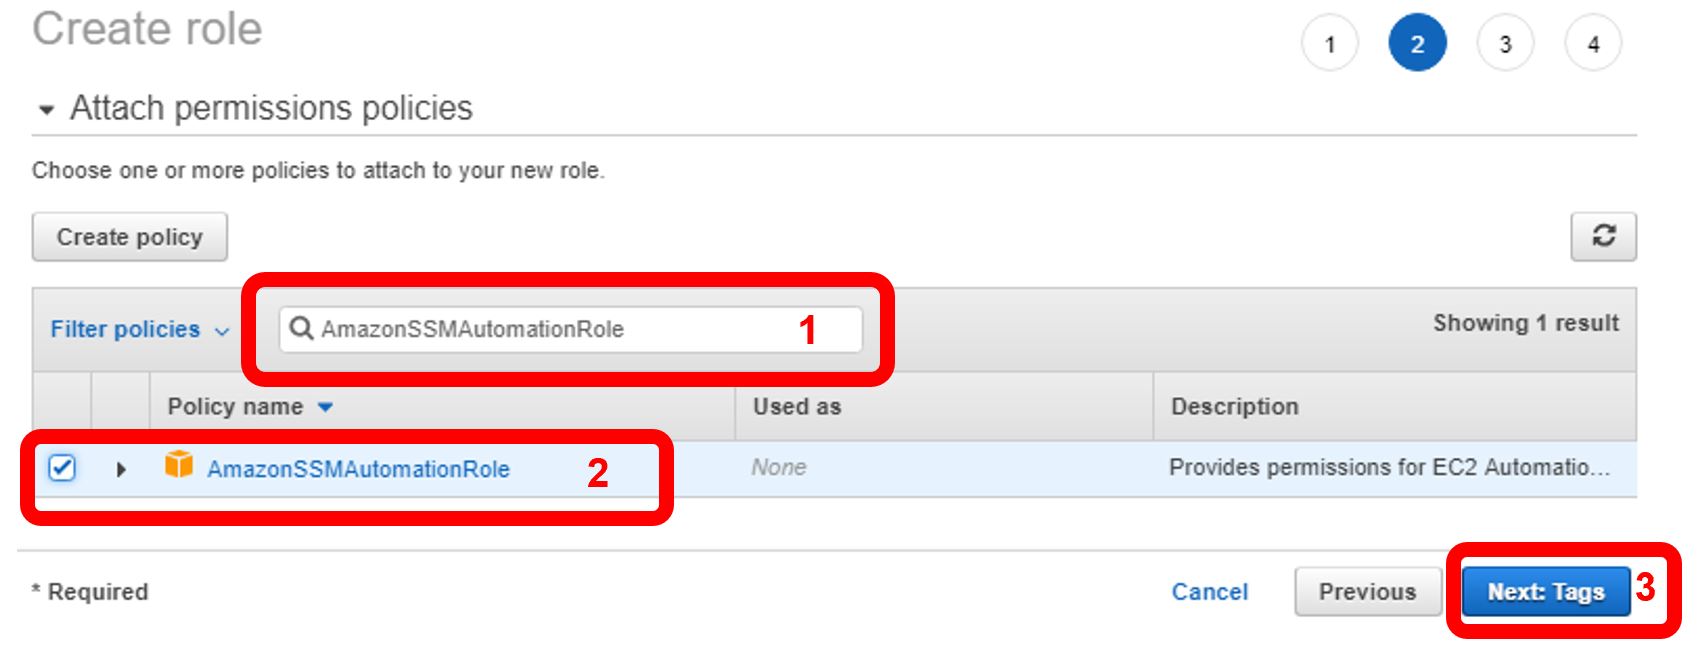
Click next until the Review Role page appears. In this example we’ll name the role “SSMAssumeAutomationRole” (1). Then click “Create Role” (2). 
Now, we’ll specifically add the trust relationship for SSM on the newly created role. On the Roles page, select the newly created role. Click the “Trust relationships” tab (1), and then click “Edit trust relationship” (2). 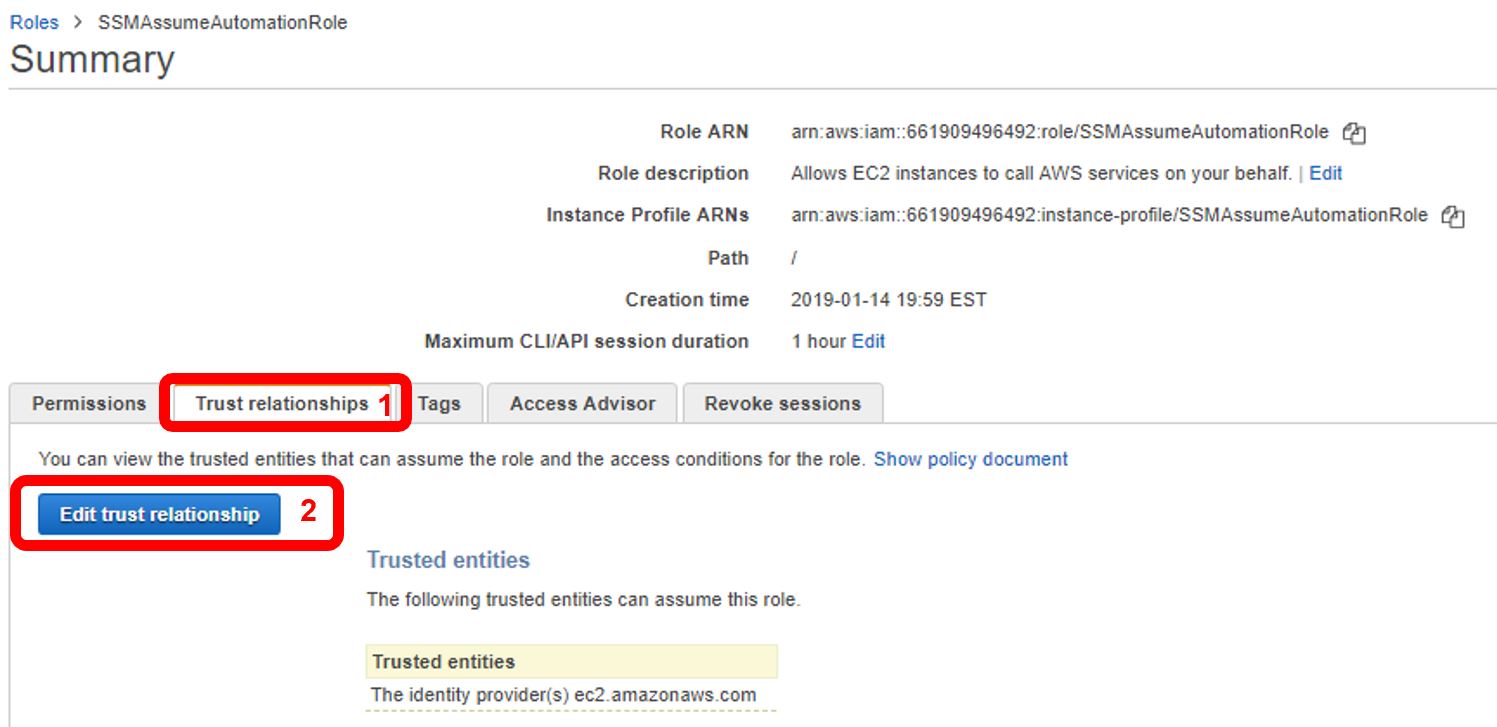
Copy and paste the following JSON text in the resulting editor window. Note the difference here; we’ve added the ssm.amazonaws.com entity to the document. Click “Update Trust Policy” when complete:
{
   "Version":"2012-10-17",
   "Statement":[
      {
         "Sid":"",
         "Effect":"Allow",
         "Principal":{
            "Service":[
               "ec2.amazonaws.com",
               "ssm.amazonaws.com"
            ]
         },
         "Action":"sts:AssumeRole"
      }
   ]
}
Before leaving the role summary page, verify the Trusted entities list reflects the addition of SSM (1). Also, copy the “Role ARN” (2) to your clipboard; we’ll need this in the next few steps.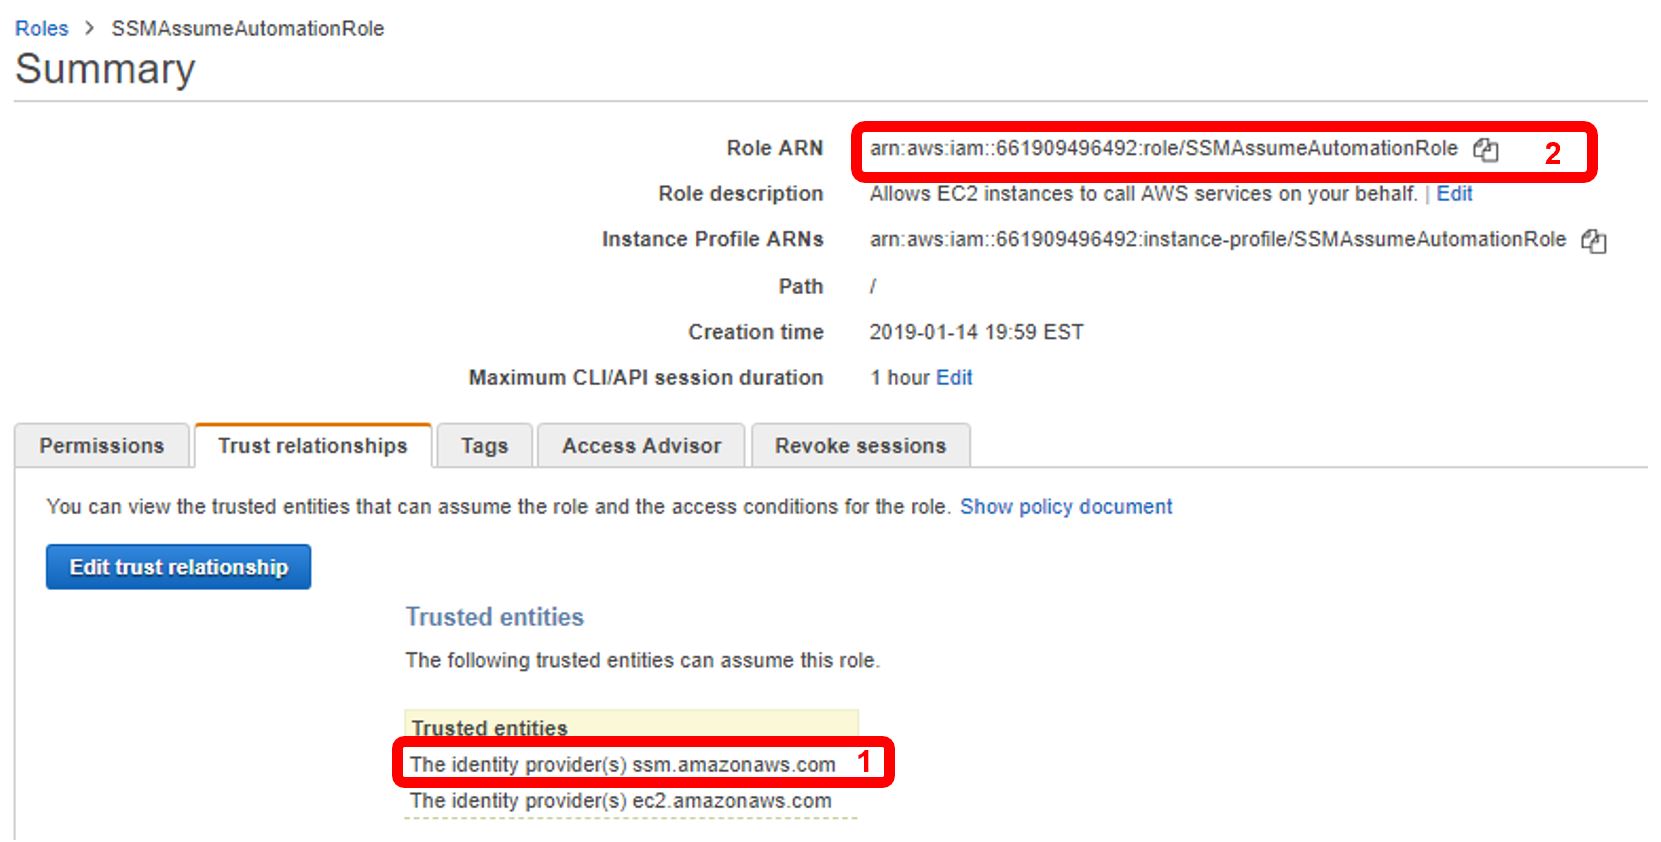
Next, we’ll create the schedule and trigger to start and stop an EC2 instance. Though the action happens within AWS System Manager Automation, the event is triggered through a CloudWatch Rule, so navigate to CloudWatch. Once there, click on “Rules” (1) and then “Create Rule” (2).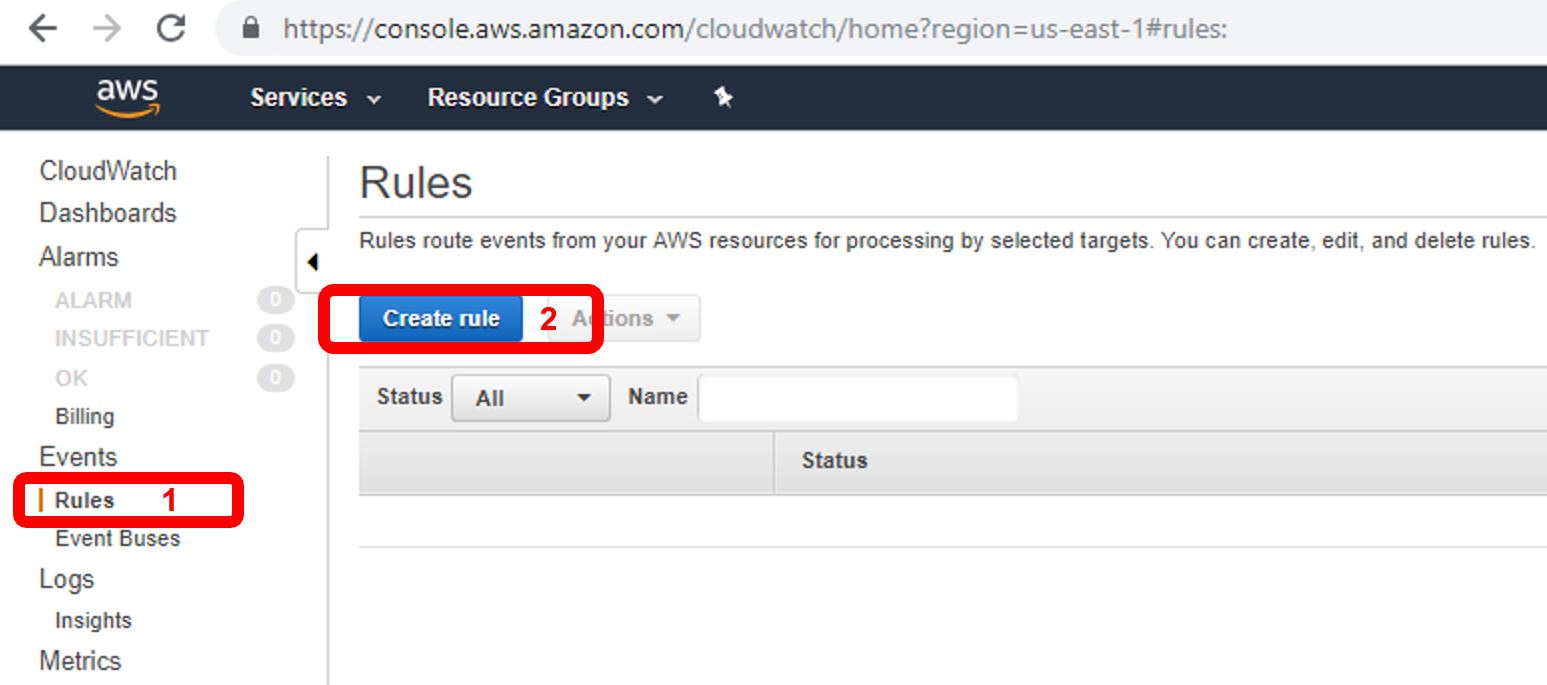
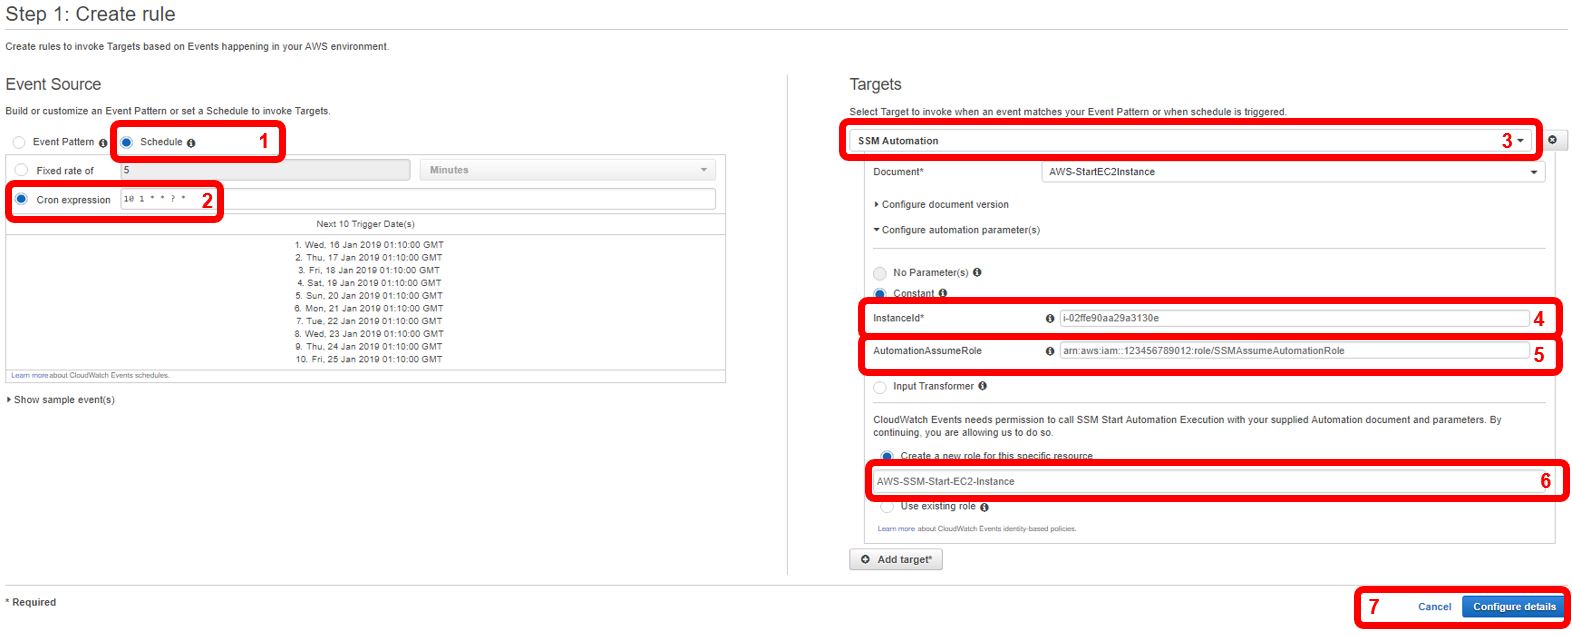
The next screen has quite a bit to configure, so we’ll walk through each parameter by the numbers (click the image to see a larger version):
- Select “Schedule” to define a specific timing this rule should be run.
- Input a schedule in AWS cron expression format. This format has an additional field from which I’m used to in standard cron; to break this down: Each asterisk represents a time value. From left to right, these values are: Minute, Hour, Day-of-Month, Month, Day-of-Week, Year. In this example, I’ve specified 10-minutes after 1 AM. Keep in mind this is based on Greenwich Mean Time. For more information on AWS cron expressions, see here. For a test first, you should set the time for a few minutes in the future; you can come back an adjust the actual start time later.
- For target, select SSM Automation and for “Document” select “AWS-StartEC2Instance.”
- With the “Constant” radio button selected, input the EC2 instance ID. This can be obtained from the EC2 dashboard and is the instance ID you wish to start/stop according to this schedule.
- For AutomationAssumptionRole, paste the ARN copied from the previous step.
- For Cloudwatch permissions, select “Create a new role for this specific resource” and rename it to something more easily identifiable. This will add a new role within IAM which provides the appropriate permissions to start the instance.
- Click “Configure details.”
Next, enter a name for the rule (1), and then click “Create rule” (2).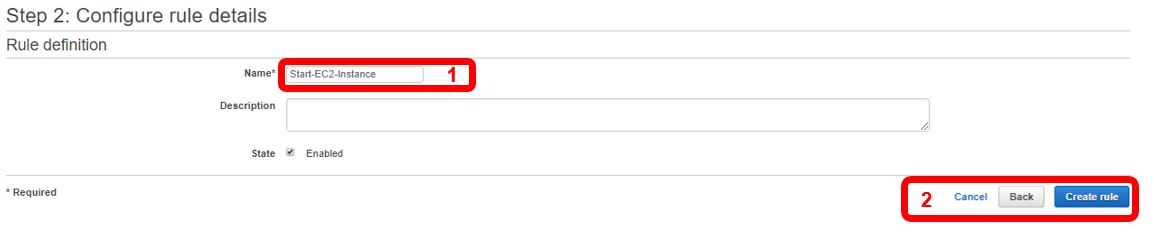
Following this step, your EC2 instance should start at the specific time scheduled in the cron expression. Check the EC2 dashboard to get confirmation your instance started at the correct time. To schedule the instance to stop, perform the exact steps above of creating another Cloudwatch rule, with two exceptions: one, for the “Create a new role for this specific resource” field, create another new role, but indicate in the name this role is for stopping the instance (Note: It’s important to not use the existing role for creating the instance as the policy permissions will be different), and two, under “Document*”, select “AWS-StopEC2Instance.”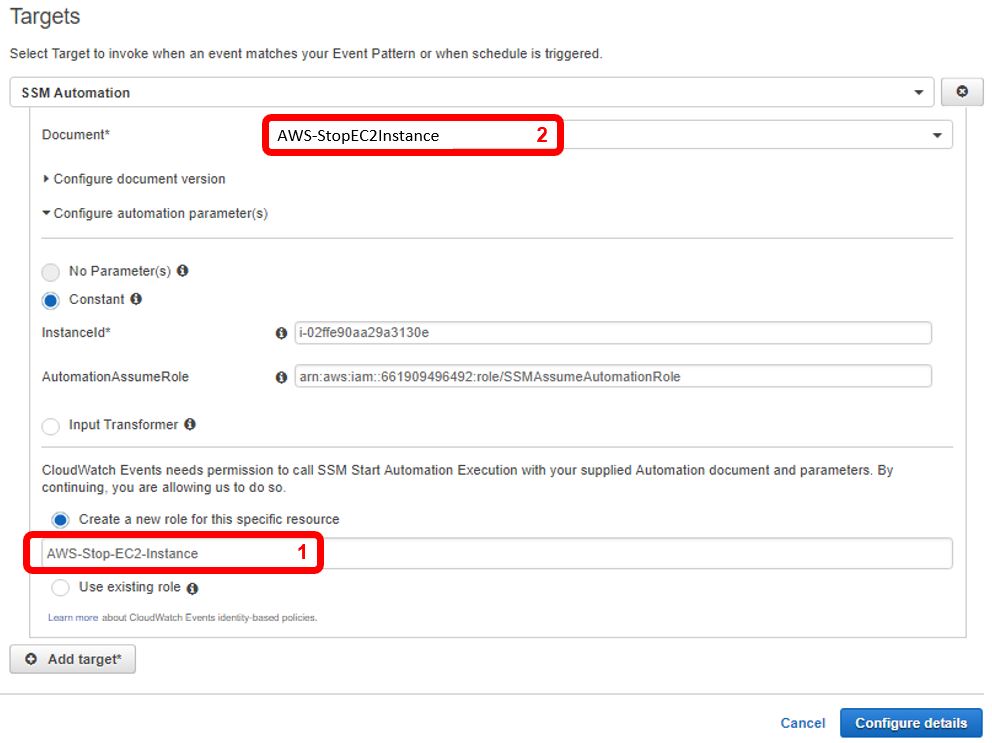
And that’s it! You’re all setup with scheduled instance start and stop times. I will note that you should monitor at least the first scheduled start and stop actions, to ensure they are functioning correctly. Expensive scenarios could arise if your start schedule works correctly, but your stop schedule does not (essentially, an instance that’s always running.)
Other Scenarios
So this trick reveals one aspect of SSM Automation, but there are many other scenarios where it can be leveraged: Performing scheduled reboots, patching instances, updating AMIs, creating or deleting snapshots, backing-up RDS, etc. Check out the Systems Manager Automation page within the AWS documentation for more use cases like the above. Further, Automation is just one aspect of AWS System Manager. Explore the System Manager dashboard to see how it can assist with managing your cloud infrastructure.
Final Notes
Like all things within AWS, nothing is always free all the time. AWS System Manager can cost money; however, in my use case it doesn’t. So understand your particular application of this service before fully committing. Hopefully, you find this how-to helpful. And if you’re doing other nifty things with AWS SSM automation (or with AWS in general), please let me know.