
Just last year I became aware of serverless as a real thing: Running entire architectures without using a single server, and not having to maintain all the aspects of those servers. Instead, leveraging Cloud offerings to pick up the various functions of running applications in the cloud, spread across a potentially wide array of microservices. It wasn’t until I watched this video, from Serverless Conference 2017,that I became aware of how much of a game changer serverless technology is and will become. Spoiler alert: The gentlemen in this video serves hundreds of thousands of users per year and streams 4TB of content per day with a total serverless compute bill of just $700…still shocking to think about.
In my work environment, there are regulatory restrictions which currently prevent us from moving to serverless (or full cloud, for that matter), so I decided to tinker with it in my spare time. In fact, it’s where this website came from. Up until a few days ago, this website was built upon a serverless architecture which look something like this: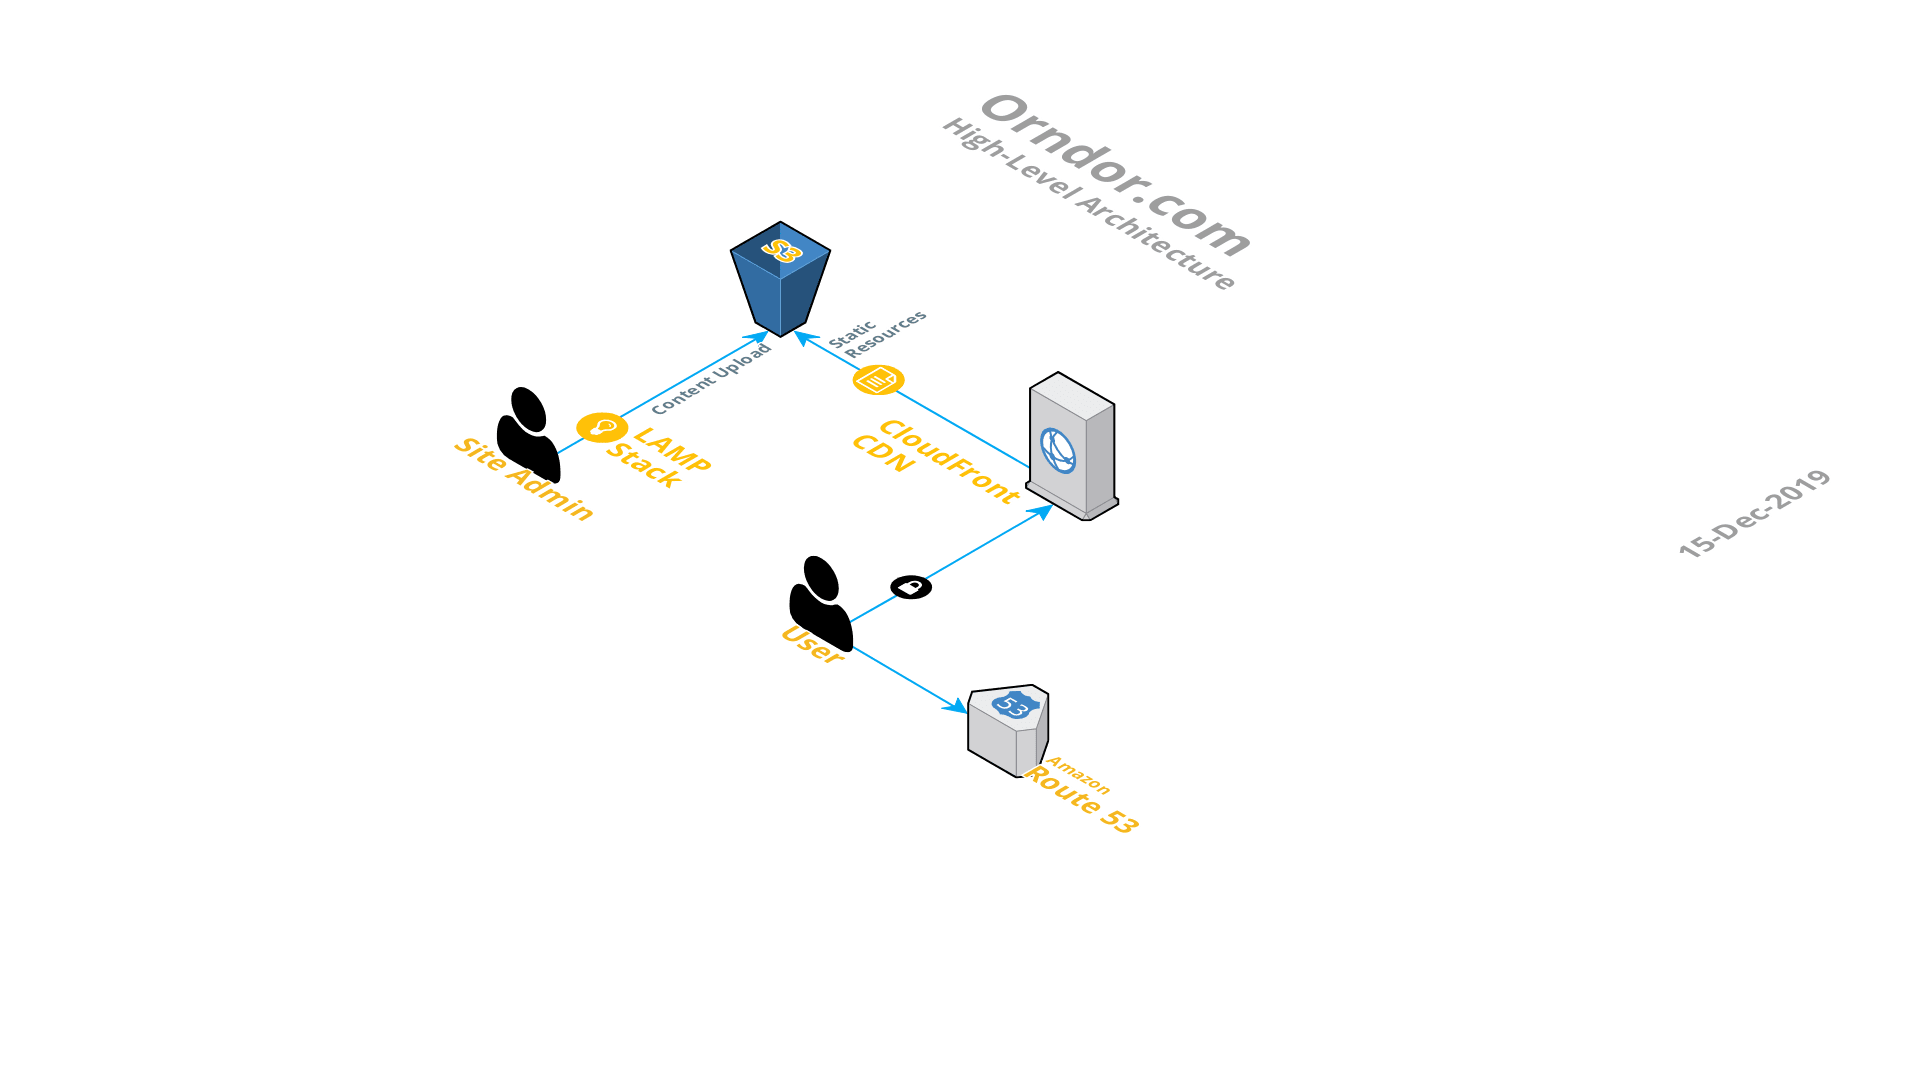
Mostly hosted on AWS, the individual components breakdown as follows:
- LAMP Stack – A Linux, Apache, MySQL, and PHP hosted on my laptop. All of these individual pieces are packaged up in a very convenient piece of software called AMPPS. AMPPS installs as a regular program on my home computer as an overlay which manages these sub-components under a simple GUI interface.
- WordPress – From within AMPPS, I installed WordPress, which uses these components to run an instance of a blog site on my computer. This is the master copy of my blog. Each time I make a new post or update something, I simply spin up AMPPS, login to the WordPress, and edit away. After the editing is complete, I package up the website to become a static one, where all of the dynamic content is removed. This is performed via a WordPress plugin call Simply Static.
- S3 – AWS Simple Storage Service. Here, I have a single bucket where I sync the Simply Static generated files. The bucket is configured for static website hosting, which provides a public facing URL to access in a web browser.
- CloudFront CDN – From there, a CloudFront distribution publishes all files from within the bucket to Edge locations. So when a user accesses this website, they pulling cached content from an edge location nearest them, to receive the website content as quickly as possible.
- Route53 – AWS DNS service is the first interaction a user has with this website when requesting a page. A browser resolves orndor.com to the CloudFront distribution where the static S3 files have been distributed.
So, technically not a single server in the entire architecture. The LAMP stack is arguable, though, as this is a temporary server instance hosted on my laptop (thus the first reason for the asterisk in the title of this post), running for the duration for which I’m making edits or updates to this site. Best of all, all of this together cost me $1 per month. And all of that cost is with Route53 (I host two zones, which are 50-cents per month), everything else is within the AWS free tier.
I did mention that this was the architecture of this site. Over the last few weeks, I been working on a project to reshape the logging infrastructure at my work. I came across another solid video from AWS re:Invent on this topic. Again, this video largely leverages cloud technologies, which I can’t fully currently take advantage of in my data center. However, there was some great overall logging advice and powerful architectures laid out which I wanted to test out. So, as of today, this site now looks more like this: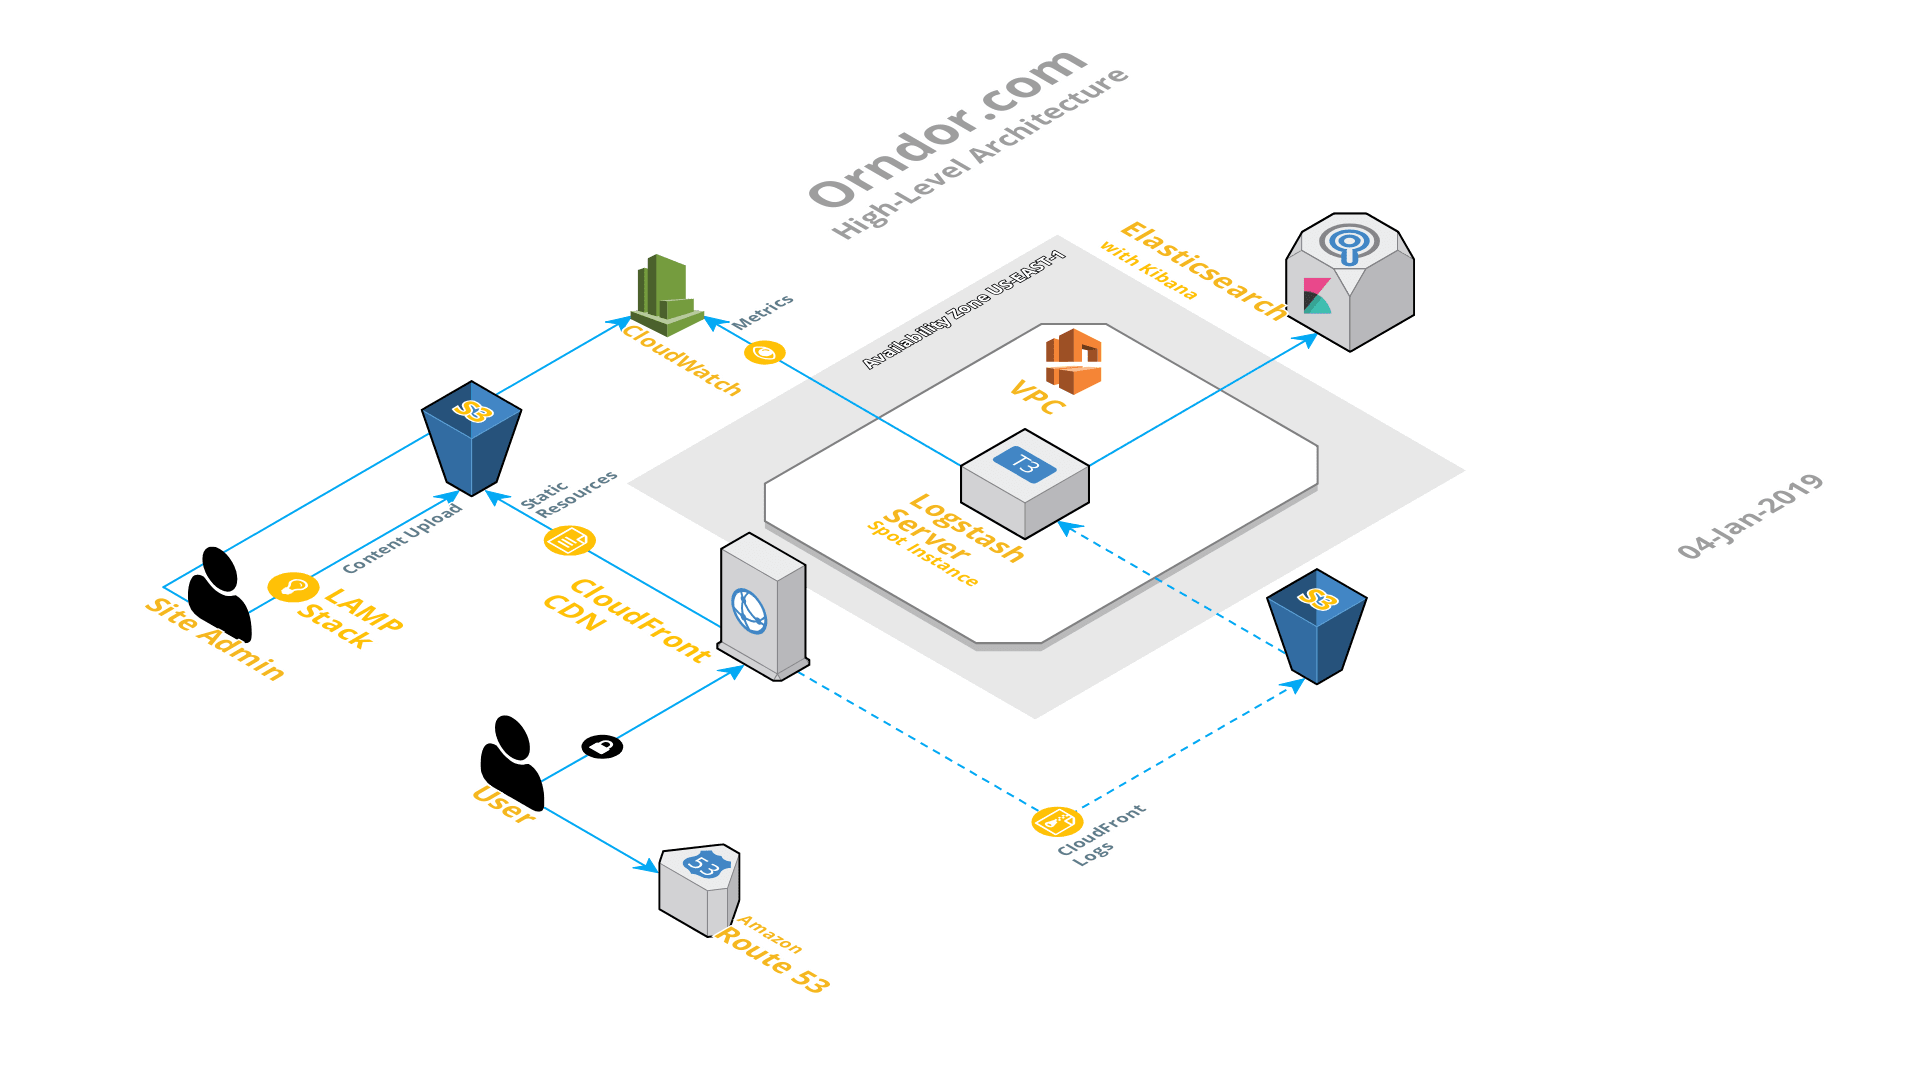 In this new architecture, I added the following:
- Another S3 Bucket – The CloudFront distribution is configured to dump all distribution access logs (i.e. website hits) to this S3 bucket.
- t3.Small Spot Instance – This is the cheapest, smallest instance class which will run Logstash due to Java RAM requirements (2GB). Because I don’t require this server to be up all of the time, and to simply process and ship data to elasticsearch from time to time, I went with a Spot Instance (and the second reason there is an asterisk in my title). Basically, an EC2 instance that runs on unused AWS infrastructure at far below the on-demand price (70% below in my case.) The downside being, if AWS should need to reclaim these resources, they’ll terminate my instance with a 2-minute warning. However, no big deal because another spot instance will spin up when the resources become available again. This instance is based on an Amazon Linux 2 AMI customized with a couple add-ons:
- Logstash -A robust log processing server which pipelines data of interest to an Elasticsearch domain for search and analytics.
- AWS Cloudwatch Agent – For sending additional server performance metrics to Amazon Cloudwatch, namely RAM utilization.
- Elasticsearch Domain – Performs indexing for searching through content delivered from Logstash. This domain also runs in the free tier level (via a t2.small instance) and is a fully managed service from AWS, with the best part being a fully integrated Kibana engine. Kibana is a fantastic tool which allows you to visually slice and dice the ingested Elasticsearch data anyway you need.
All-in-all, fairly straightforward to setup with some exceptions to note on Logstash. It’s extremely flexible and powerful, but some of the published documentation out there for integration with AWS Elasticsearch is a few versions behind. The biggest wrinkle this causes is with the Logstash custom configuration templates–they are particularly paired with Logstash version numbers (specifically templates for versions below 6.X compared to those above 6.X). More so, there still appears to be a lingering bug with the code which I butt heads with, which is documented (but not fixed) in the main version. Oh yeah, and the most amazing thing about all of this, it all for below $6 a month.
In the short term, I will be putting together a how-to video for configuring many of these items.